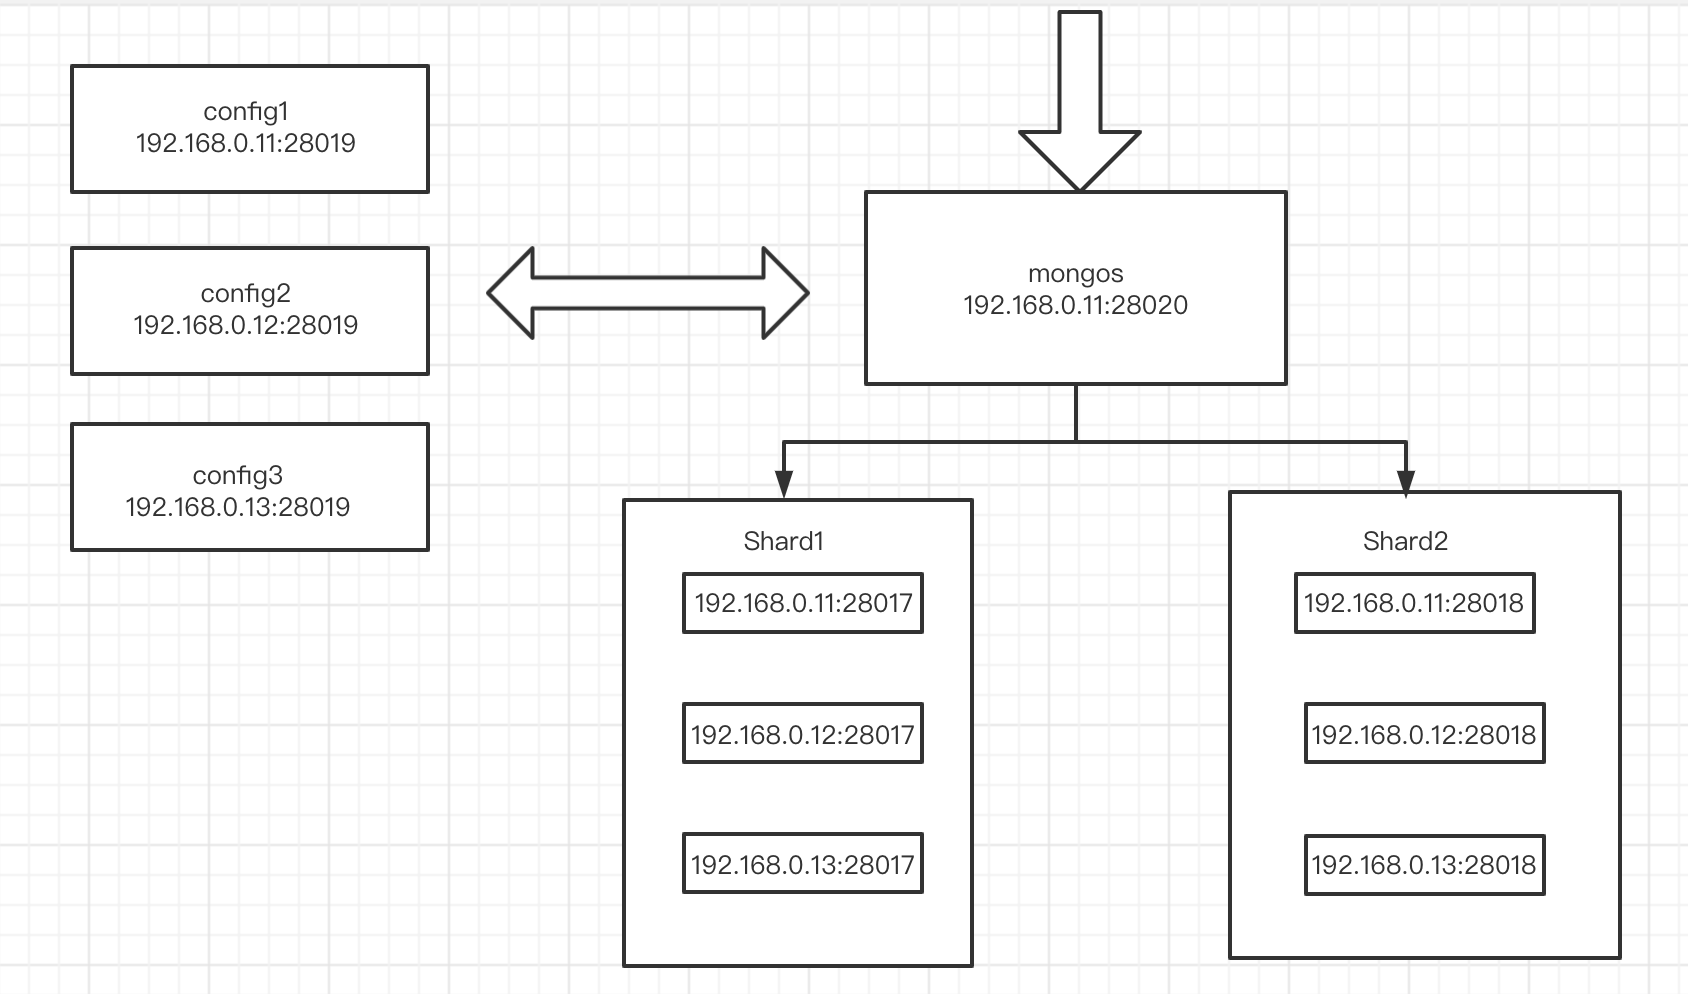
规划
测试机器没有那么多,所以采用三台机器多实例的办法,应该一台机器一个实例
| 配置 |
IP |
角色 |
| 4c8g |
192.168.0.11(db1) |
shard1(node1(28017))、shard2(node1(28018))、config(node1(28019))、mongos(28021) |
| 4c8g |
192.168.0.12(db2) |
shard1(node2(28017))、shard2(node2(28018))、config(node1(28019)) |
| 4c8g |
192.168.0.13(db3) |
shard1(node3(27017))、shard2(node3(28018))、config(node1(28019)) |
配置分片集群
配置文件
1
2
3
4
5
6
7
8
9
10
11
12
13
14
15
16
17
18
19
20
21
22
23
24
25
26
27
28
29
30
31
32
33
34
35
36
37
38
39
40
41
42
43
44
45
46
47
48
49
50
51
52
53
54
55
56
57
58
59
60
61
62
63
64
65
66
67
68
69
70
71
72
73
74
75
76
77
78
79
80
81
82
83
84
85
86
87
88
89
90
91
92
93
94
95
96
97
98
99
100
101
102
103
104
105
106
107
108
109
|
cat >> /etc/hosts <<EOF
192.168.0.11 db1
192.168.0.12 db2
192.168.0.13 db3
EOF
mkdir -p /mongodb/{28017..28019}/{conf,data,log}
chown -R mongod.mongod /mongodb
su - mongod
cat > /mongodb/28017/conf/mongodb.conf <<EOF
systemLog:
destination: file
path: /mongodb/28017/log/mongodb.log
logAppend: true
storage:
journal:
enabled: true
dbPath: /mongodb/28017/data
directoryPerDB: true
#engine: wiredTiger
wiredTiger:
engineConfig:
cacheSizeGB: 1
directoryForIndexes: true
collectionConfig:
blockCompressor: zlib
indexConfig:
prefixCompression: true
net:
bindIpAll: true
port: 28017
replication:
oplogSizeMB: 2048
replSetName: sh1
sharding:
clusterRole: shardsvr
processManagement:
fork: true
EOF
cat > /mongodb/28018/conf/mongodb.conf <<EOF
systemLog:
destination: file
path: /mongodb/28018/log/mongodb.log
logAppend: true
storage:
journal:
enabled: true
dbPath: /mongodb/28018/data
directoryPerDB: true
#engine: wiredTiger
wiredTiger:
engineConfig:
cacheSizeGB: 1
directoryForIndexes: true
collectionConfig:
blockCompressor: zlib
indexConfig:
prefixCompression: true
net:
bindIpAll: true
port: 28018
replication:
oplogSizeMB: 2048
replSetName: sh2
sharding:
clusterRole: shardsvr
processManagement:
fork: true
EOF
cat > /mongodb/28019/conf/mongodb.conf <<EOF
systemLog:
destination: file
path: /mongodb/28019/log/mongodb.log
logAppend: true
storage:
journal:
enabled: true
dbPath: /mongodb/28019/data/
directoryPerDB: true
#engine: wiredTiger
wiredTiger:
engineConfig:
cacheSizeGB: 1
directoryForIndexes: true
collectionConfig:
blockCompressor: zlib
indexConfig:
prefixCompression: true
net:
bindIpAll: true
port: 28019
replication:
oplogSizeMB: 2048
replSetName: configReplSet
sharding:
clusterRole: configsvr
processManagement:
fork: true
EOF
|
启动
1
2
3
4
5
6
7
8
9
10
|
mongod -f /mongodb/28017/conf/mongodb.conf
mongod -f /mongodb/28018/conf/mongodb.conf
mongod -f /mongodb/28019/conf/mongodb.conf
mongod -f /mongodb/28017/conf/mongodb.conf --shutdown
mongod -f /mongodb/28018/conf/mongodb.conf --shutdown
mongod -f /mongodb/28019/conf/mongodb.conf --shutdown
|
配置复制集
1
2
3
4
5
6
7
8
9
10
11
12
13
14
15
16
17
18
19
20
21
22
|
su - mongod
mongo --port 28017 admin
use admin
config = {_id: 'sh1', members: [
{_id: 0, host: '192.168.0.11:28017'},
{_id: 1, host: '192.168.0.12:28017'},
{_id: 2, host: '192.168.0.13:28017'}]
}
rs.initiate(config)
mongo --port 28018 admin
use admin
config = {_id: 'sh2', members: [
{_id: 0, host: '192.168.0.11:28018'},
{_id: 1, host: '192.168.0.12:28018'},
{_id: 2, host: '192.168.0.13:28018'}]
}
rs.initiate(config)
|
配置config节点
1
2
3
4
5
6
7
8
9
10
11
12
| mongo --port 28019 admin
use admin
config = {_id: 'configReplSet', members: [
{_id: 0, host: '192.168.0.11:28019'},
{_id: 1, host: '192.168.0.12:28019'},
{_id: 2, host: '192.168.0.13:28019'}]
}
rs.initiate(config)
注:configserver 可以是一个节点,官方建议复制集。configserver不能有arbiter
新版本中,要求必须是复制集
注:mongodb 3.4之后,虽然要求config server为replica set,但是不支持arbiter
|
配置mongos节点
1
2
3
4
5
6
7
8
9
10
11
12
13
14
15
16
17
18
|
mkdir -p /mongodb/28020/{conf,log}
cat > /mongodb/28020/conf/mongos.conf <<EOF
systemLog:
destination: file
path: /mongodb/28020/log/mongos.log
logAppend: true
net:
bindIpAll: true
port: 28020
sharding:
configDB: configReplSet/192.168.0.11:28019,192.168.0.12:28019,192.168.0.13:28019
processManagement:
fork: true
EOF
mongos -f /mongodb/28020/conf/mongos.conf
|
mongos添加分片集群
1
2
3
4
5
6
7
8
9
10
11
12
13
14
15
|
su - mongod
mongo 192.168.0.11:28020/admin
db.runCommand( { addshard : "sh1/192.168.0.11:28017,192.168.0.12:28017,192.168.0.13:28017",name:"shard1"} )
db.runCommand( { addshard : "sh2/192.168.0.11:28018,192.168.0.12:28018,192.168.0.13:28018",name:"shard2"} )
db.runCommand( { listshards : 1 } )
sh.status()
|
使用分片
RANGE分片配置及测试
激活数据库分片功能
1
2
3
4
5
6
7
8
| db.runCommand( { enablesharding : "数据库名称" } )
mongo 192.168.0.11:28020/admin
db.runCommand( { enablesharding : "test" } )
sh.status()
|
指定分片键对集合分片
1
2
3
4
5
6
7
8
9
10
|
use test
db.vast.ensureIndex( { id: 1 } )
show tables;
db.vest.find()
use admin
db.runCommand( { shardcollection : "test.vast",key : {id: 1} } )
sh.status()
|
集合分片验证
1
2
3
| use test
for(i=1;i<1000000;i++){ db.vast.insert({"id":i,"name":"shenzheng","age":70,"date":new Date()}); }
db.vast.stats()
|
分片结果测试
1
2
3
4
5
6
7
8
9
|
mongo --port 28017
use test
db.vast.count();
mongo --port 28018
use test
db.vast.count();
|
Hash分片
1
2
3
4
5
6
7
8
9
10
11
12
13
14
15
16
17
18
19
20
21
22
23
24
25
26
27
28
29
30
31
32
33
|
mongo 192.168.0.11:28020/admin
use admin
db.runCommand( { enablesharding : "test1" } )
sh.status()
use test1
db.vast.ensureIndex( { id: "hashed" } )
use admin
sh.shardCollection( "test1.vast", { id: "hashed" } )
sh.status()
use test1
for(i=1;i<100000;i++){ db.vast.insert({"id":i,"name":"shenzheng","age":70,"date":new Date()}); }
mongo --port 28017
use test1
db.vast.count();
mongo --port 28018
use test1
db.vast.count();
|
分片集群查询及管理
1
2
3
4
5
6
7
8
9
10
11
12
13
14
15
16
17
18
19
20
21
22
23
|
db.runCommand({ isdbgrid : 1})
db.runCommand({ listshards : 1})
use config
db.databases.find( { "partitioned": true } )
db.collections.find().pretty()
sh.status()
sh.getBalancerState()
db.runCommand( { removeShard: "shard2" } )
|
balancer操作
介绍
1
2
3
4
5
6
7
8
| mongos的一个重要功能,自动巡查所有shard节点上的chunk的情况,自动做chunk迁移,什么时候工作?
1、自动运行,会检测系统不繁忙的时候做迁移
2、在做节点删除的时候,立即开始迁移工作
3、balancer只能在预设定的时间窗口内运行
有需要时可以关闭和开启blancer(备份的时候)
sh.stopBalancer()
sh.startBalancer()
|
自动平衡时间段
1
2
3
4
5
6
7
8
9
10
11
12
13
14
15
16
17
18
19
|
use config
sh.setBalancerState( true )
db.settings.update({ _id : "balancer" }, { $set : { activeWindow : { start : "3:00", stop : "5:00" } } }, true )
sh.getBalancerWindow()
sh.status()
sh.disableBalancing("students.grades")
sh.enableBalancing("students.grades")
db.getSiblingDB("config").collections.findOne({_id : "students.grades"}).noBalance
|
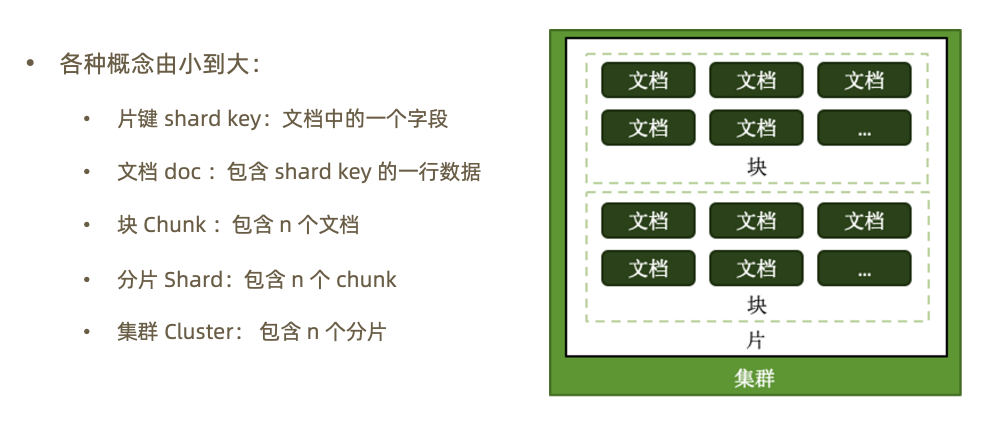
分片集群设计
分片的基本标准
1
2
3
| 1.关于数据:数据量不超过3TB,尽可能保持在2TB一个片
2.关于索引:常用索引必须容纳进内存
3.按照以上标准初步确定分片后,还需要考虑业务压力,随着压力增大,CPU、RAM、磁盘中的任何一项出现瓶颈时,都可以通过添加更多分片来解决
|
需求多少分片
| 条件 |
分片个数 |
| A = 所需存储总量 / 单服务器可挂载容量 |
8TB / 2TB = 4 |
| B = 工作集大小 / 单服务器内存容量 |
400GB / (256G * 0.6) = 3 |
| C = 并发量总数 / (单服务器并发量 * 0.7) |
30000 / (9000*0.7) = 6 |
| 额外开销 |
|
其他需求
1
2
3
4
| 考虑分片的分布:
1.是否需要跨机房分布分片
2.是否需要容灾
3.高可用的要求如何
|
正确的姿势
选择合适的片键
1
2
3
4
5
6
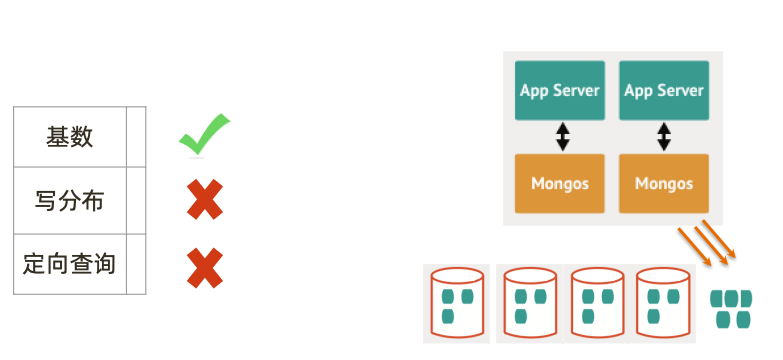
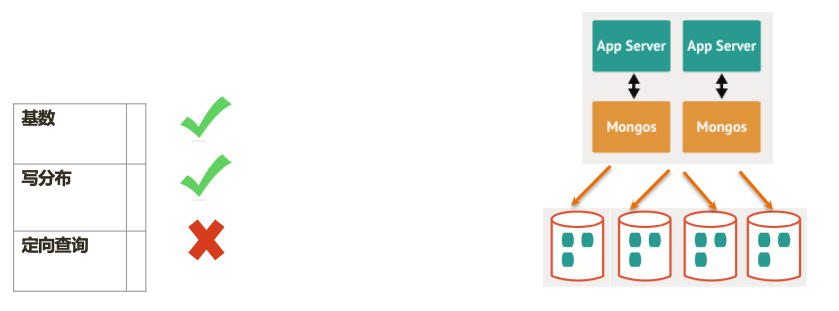
| 影响片键效率的主要因素:
1.取值基数(Cardinality)
2.取值分布
3.分散写,集中读
4.被尽可能多的业务场景用到
5.避免单调递增或递减的片键
|
选择基数大的片键
1
2
3
4
5
6
7
8
9
| 对于小基数的片键:
1.因为备选值有限,那么块的总数量就有限
2.随着数据增多,块的大小会越来越大
3.水平扩展时移动块会非常困难
例如:存储一个高中的师生数据,以年龄(假设年龄范围为15~65岁)作为片键,那么:
1.15<=年龄<=65,且只为整数
2.最多只会有51个 chunk
结论:取值基数要大
|
选择分布均匀的片键
1
2
3
4
5
6
7
8
9
10
| 对于分布不均匀的片键
1.造成某些块的数据量急剧增大
2.这些块压力随之增大
3.数据均衡以 chunk 为单位,所以系统无能为力
例如:存储一个学校的师生数据,以年龄(假设年龄范围为15~65岁)作为片键,那么:
1.15<=年龄<=65,且只为整数
2.大部分人的年龄范围为15~18岁(学生)
3.15、16、17、18四个 chunk 的数据量、访问压力远大于其他 chunk
结论:取值分布应尽可能均匀
|
例子
1
2
3
4
5
6
7
8
9
| {
_id: ObjectId(),
user: 123,
time: Date(),
subject: “...”,
recipients: [],
body: “...”,
attachments: []
}
|
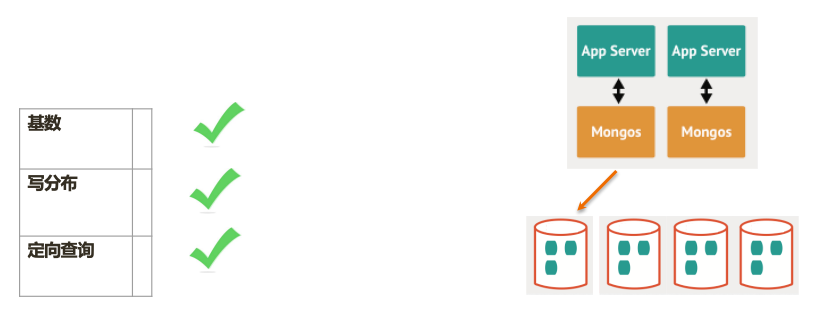
片键: { _id: 1}
片键: { _id: ”hashed”}
片键: { user_id: 1 }
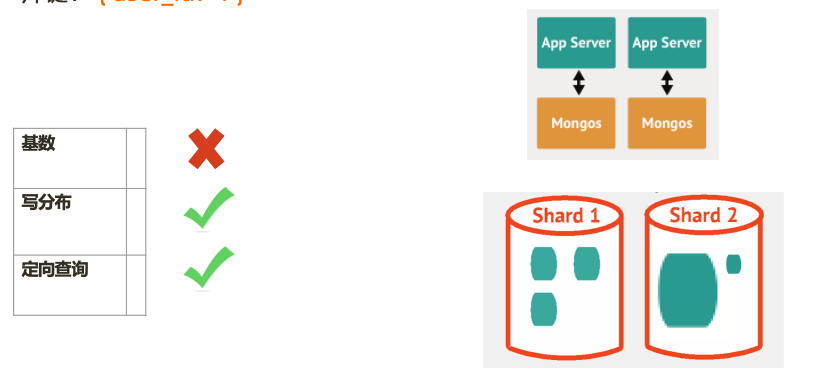
片键: { user_id: 1, time:1 }
硬件规划
1
2
3
4
5
6
7
8
9
10
| mongos 与 config 通常消耗很少的资源,可以选择低规格虚拟机,资源的重点在于 shard 服务器:
1.需要足以容纳热数据索引的内存
2.正确创建索引后 CPU 通常不会成为瓶颈,除非涉及非常多的计算
3.磁盘尽量选用 SSD
4.最后,实际测试是最好的检验,来看你的资源配置是否完备
即使项目初期已经具备了足够的资源,仍然需要考虑在合适的时候扩展。建议监控各项资源使用情况,无论哪一项达到60%以上,则开始考虑扩展,因为:
1.扩展需要新的资源,申请新资源需要时间
2.扩展后数据需要均衡,均衡需要时间。应保证新数据入库速度慢于均衡速度
3.均衡需要资源,如果资源即将或已经耗尽,均衡也是会很低效的
|