Scrapy爬虫框架

Scrapy的使用

1
2
3
4
5
6
7
8
9
10
11
12
13
14
15
16
17
18
19
20
21
22
23
24
25
26
27
28
scrapy: 是一个框架,类似于djagno框架,在固定的位置写固定的代码即可
基于这个框架写一个爬虫项目

安装
pip3 install scrapy
'''
win上可能装不上(90%都能装上)其实是因为twisted装不上
pip3 install wheel 装了它,以后支持直接使用whl文件安装

安装后,便支持通过wheel文件安装软件,wheel文件官网:https://www.lfd.uci.edu/~gohlke/pythonlibs

pip3 install lxml
pip3 install pyopenssl

下载并安装pywin32:https://sourceforge.net/projects/pywin32/files/pywin32/
下载twisted的wheel文件:http://www.lfd.uci.edu/~gohlke/pythonlibs/#twisted
执行pip3 install 下载目录\Twisted-17.9.0-cp36-cp36m-win_amd64.whl
pip3 install scrapy
'''

# 命令行创建项目
scrapy startproject myfirst

# 创建爬虫 scrapy genspider 爬虫名 爬虫地址
scrapy genspider cnblogs www.cnblogs.com

# 运行爬虫
scrapy crawl cnblogs

Scrapy目录结构

1
2
3
4
5
6
7
8
├── first_scrapy         # 项目名字
│ ├── items.py # 模型类写了一些字段,类似于django的models
│ ├── middlewares.py # 中间件:爬虫中间件和下载中间件
│ ├── pipelines.py # 管道:存储数据的代码写在这
│ ├── settings.py # 项目的配置文件
│ └── spiders # 文件夹,下面放了一个个爬虫文件
│ └── cnblogs.py # 一个个的爬虫文件
└── scrapy.cfg # 项目上线需要用到,不用管

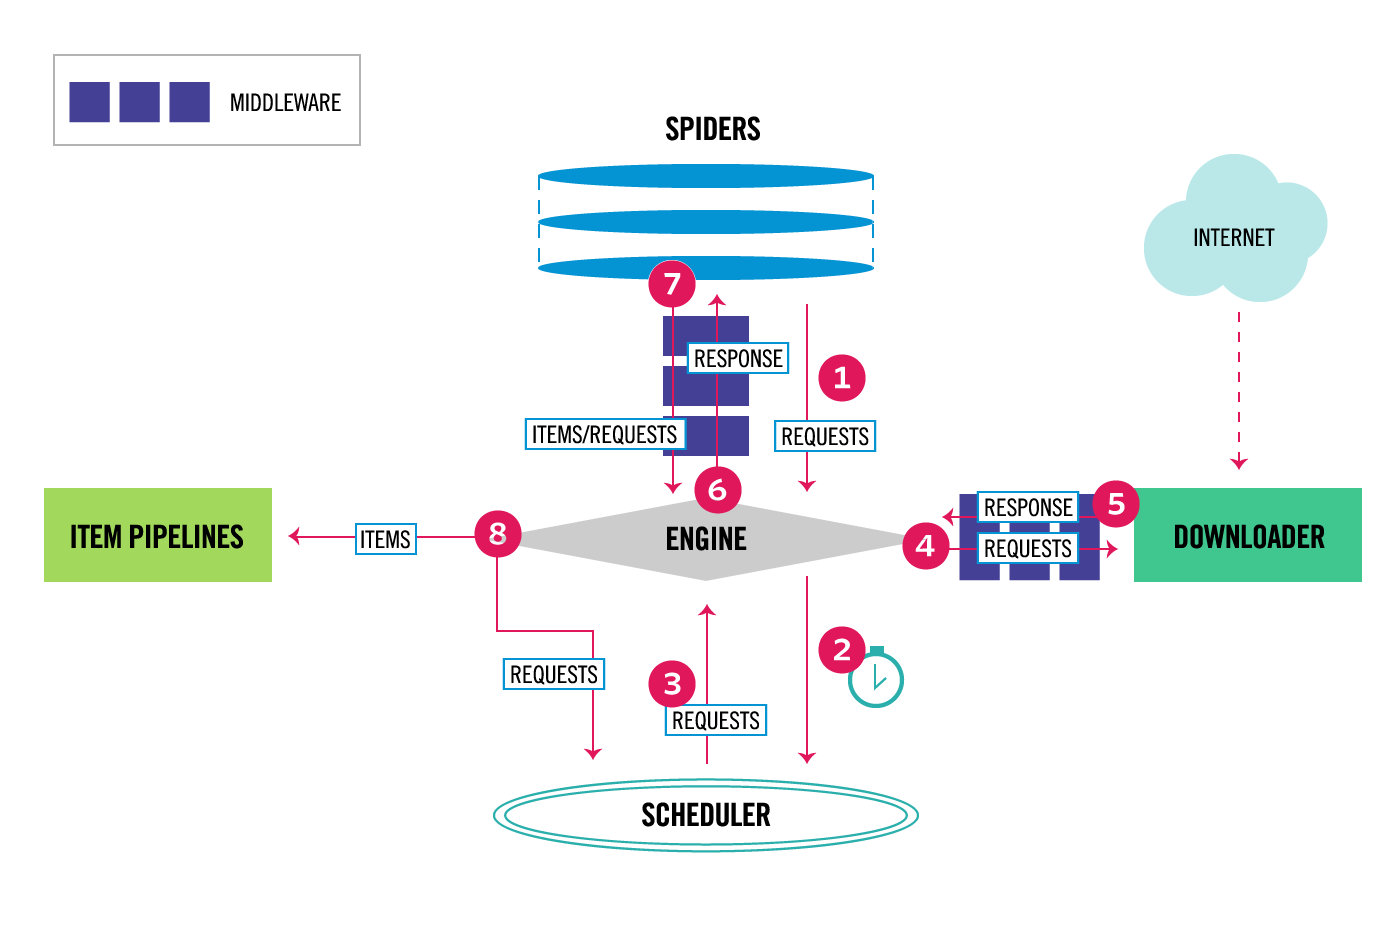
Scrapy架构

1
2
3
4
5
6
7
8
9
10
11
12
13
14
15
16
17
18
19
20
21
# 引擎(EGINE)-->大总管,负责全部的数据流向--》内置的,咱们不需要写

引擎负责控制系统所有组件之间的数据流,并在某些动作发生时触发事件

# 调度器(SCHEDULER)---》对要爬取的地址进行排队,去重
用来接受引擎发过来的请求, 压入队列中, 并在引擎再次请求的时候返回. 可以想像成一个URL的优先级队列, 由它来决定下一个要抓取的网址是什么, 同时去除重复的网址

# 下载器(DOWLOADER)--》真正负责下载---》高效的异步模型
用于下载网页内容, 并将网页内容返回给EGINE,下载器是建立在twisted这个高效的异步模型上的

# 爬虫(SPIDERS)--》咱们重点写的地方,解析响应,从响应中提取要保存的数据和下一次爬取的地址
SPIDERS是开发人员自定义的类,用来解析responses,并且提取items,或者发送新的请求

# 项目管道(ITEM PIPLINES)---》存储数据的逻辑---》可以存到文件,redis,mysql。。。
在items被提取后负责处理它们,主要包括清理、验证、持久化(比如存到数据库)等操作

# 下载器中间件(Downloader Middlewares)--》用的多
位于Scrapy引擎和下载器之间,主要用来处理从EGINE传到DOWLOADER的请求request(加请求头,加cookie,加代理),已经从DOWNLOADER传到EGINE的响应response进行一些处理

# 爬虫中间件(Spider Middlewares)---》用的少
位于EGINE和SPIDERS之间,主要工作是处理SPIDERS的输入(即responses)和输出(即requests)

img

配置运行爬虫

1
2
3
4
5
6
7
# first_scrapy/run.py  pycharm中的运行


from scrapy import cmdline

# cmdline.execute(['scrapy', 'crawl' ,'cnblogs','--nolog'])
cmdline.execute(['scrapy', 'crawl', 'cnblogs'])

Scrapy解析数据

1
2
3
4
5
6
7
8
9
10
11
12
13
14
15
16
17
1. response对象有css方法和xpath方法
css中写css选择器
xpath中写xpath选择

2.
xpath取文本内容
'.//a[contains(@class,"link-title")]/text()'
xpath取属性
'.//a[contains(@class,"link-title")]/@href'
css取文本
'a.link-title::text'
css取属性
'img.image-scale::attr(src)'

3.
.extract_first() 取一个
.extract() 取所有

first_scrapy/spiders/cnblogs.py

css
1
2
3
4
5
6
7
8
9
10
11
12
13
14
15
16
17
18
19
20
21
22
23
24
25
26
27
28
29
30
31
32
33
34
35
36
37
38
39
40
41
42
43
44
45
46
import scrapy

class CnblogsSpider(scrapy.Spider): # 爬虫类
name = 'cnblogs' # 爬虫名
allowed_domains = ['www.cnblogs.com'] # 允许爬取的域 只爬取该域下的
start_urls = ['https://www.cnblogs.com/'] # 起始爬取的地址

def parse(self, response): # 解析方法 爬取完后的 response 会到这执行
# print(response) # 从 response 解析数据
# 解析出文章的标题 摘要 作者 作者头像 并继续爬取出文章详情
# 将爬取的结果组装成一个对象存起来

# 使用 bs4 解析出需要的数据 scrapy 自带解析库 不需要bs4 支持 css 和 xpath
# print(response.text)

article_list = response.css('article.post-item')
for article in article_list:
# 获取标题
title = article.css('section > div > a::text').extract_first()
# title = article.css('section > div > a::text').extract()[0] # 和上面相等
# print(title)

# 获取摘要
desc = article.css('section > div > p::text').extract()[0].replace('\n', '').replace(' ', '')
if not desc:
desc = article.css('section > div > p::text').extract()[1].replace('\n', '').replace(' ', '')
# print(desc)

# 作者名称
author_name = article.css('section > footer > a > span::text').extract_first()
# print(author_name)

# 作者头像
author_img = article.css('section > div > p > a > img::attr(src)').extract_first()
# print(author_img)

# 文章详情地址
article_url = article.css('section > div > a::attr(href)').extract_first()
# print(article_url)
print(f'''
文章标题:{title},
文章摘要:{desc},
作者名称:{author_name},
作者头像:{author_img},
文章详情:{article_url},
''')
xpath
1
2
3
4
5
6
7
8
9
10
11
12
13
14
15
16
17
18
19
20
21
22
23
24
25
26
27
28
29
30
31
import scrapy

class CnblogsSpider(scrapy.Spider):
name = 'cnblogs'
allowed_domains = ['www.cnblogs.com']
start_urls = ['https://www.cnblogs.com/']

def parse(self, response):
article_list = response.xpath('//article[@class="post-item"]')
for article in article_list:
# 获取标题
title = article.xpath('./section/div/a/text()').extract_first()
desc = article.xpath('./section/div/p/text()').extract()[0].replace('\n', '').replace(' ', '')
if not desc:
desc = article.xpath('./section/div/p/text()').extract()[1].replace('\n', '').replace(' ', '')
# 作者名称
author_name = article.xpath('./section/footer/a/span/text()').extract_first()

# 作者头像
author_img = article.xpath('./section/div/p/a/img/@src').extract_first()

# 文章详情地址
article_url = article.xpath('./section/div/a/@href').extract_first()
print(f'''
文章标题:{title},
文章摘要:{desc},
作者名称:{author_name},
作者头像:{author_img},
文章详情:{article_url},
''')

setting配置说明

first_scrapy/settings.py

1
2
3
4
5
6
7
# 内置一套,用户一套
ROBOTSTXT_OBEY = False # 是否遵循爬虫协议,如果写了它,一般网站都不让爬,基本写成false
USER_AGENT = '浏览器头' # 爬虫请求头中USER_AGENT是什么,做成浏览器的样子
LOG_LEVEL='ERROR' # 日志级别改成ERROR,以后错误日志会打印,普通日志不打印
SPIDER_MIDDLEWARES=[] # 爬虫中间件,可以写多个
DOWNLOADER_MIDDLEWARES=[] # 下载中间件类,配置在这,可以配多个
ITEM_PIPELINES=[] # 保存数据,会执行到的类,类内部写保存逻辑
1
2
3
4
5
6
7
8
9
10
11
12
13
# 1 增加并发
默认scrapy开启的并发线程为32个,可以适当进行增加。在settings配置文件中修改CONCURRENT_REQUESTS = 100值为100,并发设置成了为100

# 2 降低日志级别
在运行scrapy时,会有大量日志信息的输出,为了减少CPU的使用率。可以设置log输出信息为INFO或者ERROR即可。在配置文件中编写:LOG_LEVEL = 'INFO'

# 3 禁止cookie
如果不是真的需要cookie,则在scrapy爬取数据时可以禁止cookie从而减少CPU的使用率,提升爬取效率。在配置文件中编写:COOKIES_ENABLED = False
# 4 禁止重试
对失败的HTTP进行重新请求(重试)会减慢爬取速度,因此可以禁止重试。在配置文件中编写:RETRY_ENABLED = False

# 5 减少下载超时
如果对一个非常慢的链接进行爬取,减少下载超时可以能让卡住的链接快速被放弃,从而提升效率。在配置文件中进行编写:DOWNLOAD_TIMEOUT = 10 超时时间为10s

全站爬取cnblogs文章

first_scrapy/spiders/cnblogs.py

1
2
3
4
5
6
7
8
9
10
11
12
13
14
15
16
17
18
19
20
21
22
23
24
25
26
27
28
29
30
31
32
33
34
35
36
37
38
39
40
41
42
43
44
45
46
47
48
49
50
51
import scrapy
from scrapy.http import Request
from ..items import FirstScrapyItem


class CnblogsSpider(scrapy.Spider): # 爬虫类
name = 'cnblogs' # 爬虫名
allowed_domains = ['www.cnblogs.com'] # 允许爬取的域 只爬取该域下的
start_urls = ['https://www.cnblogs.com/'] # 起始爬取的地址

def parse(self, response): # 解析方法 爬取完后的 response 会到这执行
article_list = response.css('article.post-item')
for article in article_list:
title = article.css('section > div > a::text').extract_first()
desc = article.css('section > div > p::text').extract()[0].replace('\n', '').replace(' ', '')
if not desc:
desc = article.css('section > div > p::text').extract()[1].replace('\n', '').replace(' ', '')
author_name = article.css('section > footer > a > span::text').extract_first()
author_img = article.css('section > div > p > a > img::attr(src)').extract_first()
article_url = article.css('section > div > a::attr(href)').extract_first()

# 需要一个文章对象 属于items中模型类的对象
item = FirstScrapyItem()
# 必须使用 [] 不能使用 . 赋值
item['title'] = title
item['desc'] = desc
item['author_name'] = author_name
item['author_img'] = author_img
# 缺文章详情 detail

# 继续爬取文章详情页 文章详情页的解析方法不能继续使用这个 需要一个单独的解析方法 爬完会触发
yield Request(url=article_url, callback=self.parse_detail, meta={"item": item})

# 下一页地址
next_url = 'https://www.cnblogs.com' + response.css(
'#paging_block > div > a:last-child::attr(href)').extract_first()

# next_url = 'https://www.cnblogs.com' + response.xpath(
# '//*[@id="paging_block"]/div/a[last()]/@href').extract_first()
# print(next_url)

# 继续爬取下一页 再爬完 解析方式 还是这个解析方式
yield Request(url=next_url)

def parse_detail(self, response):
# 解析出文章详情 需要对上之前文章的数据
item = response.meta.get('item')
detail = str(response.css('#cnblogs_post_body').extract_first())
item['detail'] = detail
yield item # 触发 pipeline 走存储

first_scrapy/items.py

1
2
3
4
5
6
7
8
import scrapy

class FirstScrapyItem(scrapy.Item):
title = scrapy.Field()
desc = scrapy.Field()
author_name = scrapy.Field()
author_img = scrapy.Field()
detail = scrapy.Field()

first_scrapy/settings.py

1
2
3
4
5
...
ITEM_PIPELINES = {
'first_scrapy.pipelines.FirstScrapyPipeline': 300, # 此处可以配多个 数字越小 优先级越高
}
...

first_scrapy/pipelines.py

1
2
3
4
5
6
7
8
9
10
11
12
13
14
15
16
17
18
19
20
21
22
23
24
25
26
27
28
29
30
31
from itemadapter import ItemAdapter
import pymysql


class FirstScrapyPipeline:
def open_spider(self, spider):
print("先打开")
self.conn = pymysql.connect(
user='root',
password="asd123...",
host='127.0.0.1',
database='cnblogs',
port=3306,
autocommit=True,
)
self.curosr = self.conn.cursor()

def process_item(self, item, spider):
# 会一次次触发该方法的执行 在这里写保存的逻辑
print('pipeline: ',item['title'])
# 存入MySQl数据库中
self.curosr.execute('insert into article '
'(title,`desc`,author_name,author_img,detail) values '
'(%s,%s,%s,%s,%s)',
args=[item['title'], item['desc'], item['author_name'], item['author_img'], item['detail']])
return item

def close_spider(self, spider):
print("我关闭了")
self.curosr.close()
self.conn.close()

下载中间件

1
2
3
4
5
6
7
8
9
# 爬虫和下载中间件要使用 需要在配置文件中配置
SPIDER_MIDDLEWARES = {
'crawl_cnblogs.middlewares.CrawlCnblogsSpiderMiddleware': 5,
}

# 下载中间件
DOWNLOADER_MIDDLEWARES = {
'crawl_cnblogs.middlewares.CrawlCnblogsDownloaderMiddleware': 5,
}

first_scrapy/settings.py

1
2
3
4
5
...
DOWNLOADER_MIDDLEWARES = {
'first_scrapy.middlewares.FirstScrapyDownloaderMiddleware': 543,
}
...

first_scrapy/middlewares.py

1
2
3
4
5
6
7
8
9
10
11
12
13
14
15
16
17
18
19
20
21
22
23
24
25
26
27
28
29
30
31
32
from scrapy import signals
...

class FirstScrapyDownloaderMiddleware:
@classmethod
def from_crawler(cls, crawler):
# This method is used by Scrapy to create your spiders.
s = cls()
crawler.signals.connect(s.spider_opened, signal=signals.spider_opened)
return s

# 请求来
def process_request(self, request, spider):
# 修改为随机 User-Agent
from fake_useragent import UserAgent
ua = UserAgent()
request.headers["User-Agent"] = ua.random
print(request.headers[b'User-Agent'])

# 加入cookie
# request.cookies = {}

# 加代理 可以写一个方法 将代理池的代理取出放到这里
# request.meta['proxy'] = 'http://103.130.172.34:8080'

return None

# 请求走
def process_response(self, request, response, spider):
return response

...
1
2
3
4
5
6
7
8
# fake_useragent模块,可以随机生成user-aget  
# pip3 install fake-useragent
from fake_useragent import UserAgent
ua = UserAgent()
print(ua.ie) #随机打印ie浏览器任意版本
print(ua.firefox) #随机打印firefox浏览器任意版本
print(ua.chrome) #随机打印chrome浏览器任意版本
print(ua.random) #随机打印任意厂家的浏览器