Ansible介绍
简 介
ansible是自动化运维工具,基于Python开发,集合了众多运维工具(puppet、cfengine、chef、func、fabric)的优点,实现了批量系统配置、批量程序部署、批量运行命令等
特性
优势
1
2
3
4
| 1.ansible不需要单独安装客户端,也不需要启动任何服务
2.ansible是python中的一套完整的自动化执行任务模块
3.ansible playbook,采用yaml配置,对于自动化任务执行一目了然
4.ansible 模块较多,对于自动化的场景支持较丰富
|
劣势
1
2
3
| 1.幂等性,每次的描述一种状态后,服务器会按照你所期望的状态去运行;出了问题无法回退,需要重新在描述一次状态,然后执行,以实现回退的效果
2.效率,如果连接的主机较多,执行的速度会比较的慢,速度相对比saltstack慢
|
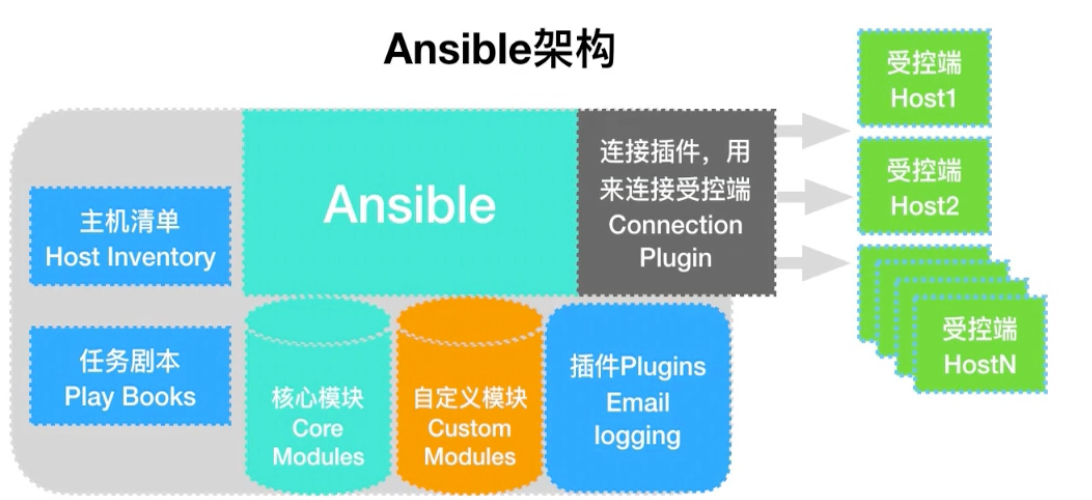
基础架构
1
2
3
4
5
6
7
| 1.连接插件connectior plugins用于连接主机 用来连接被管理端
2.核心模块 core modules 连接主机实现操作, 它依赖于具体的模块来做具体的事情
3.自定义模块 custom modules,根据自己的需求编写具体的模块
4.插件 plugins,完成模块功能的补充
5.剧本 playbooks,ansible的配置文件,将多个任务定义在剧本中,由ansible自动执行
6.主机清单 inventor,定义ansible需要操作主机的范围
最重要的一点是 ansible是模块化的 它所有的操作都依赖于模块
|

安装部署
包管理方式(yum)
1
2
3
4
5
6
7
8
9
10
11
|
curl -o /etc/yum.repos.d/epel.repo http://mirrors.aliyun.com/repo/epel-7.repo
yum install ansible -y
ansible --version
ansible localhost -m ping
|
pip安装
1
2
3
4
5
6
7
8
9
10
11
12
13
14
|
yum -y install python3 python3-devel python3-pip
pip3 install --upgrade pip -i https://pypi.douban.com/simple/
pip3 install ansible -i https://pypi.douban.com/simple/
which ansible
/usr/local/bin/ansible --version
|
配置文件说明
默认配置文件
1
2
3
4
5
6
7
8
9
10
11
12
13
14
15
16
17
18
19
|
rpm -qc ansible
/etc/ansible/ansible.cfg
/etc/ansible/hosts
|
配置文件优先级
1
2
3
4
5
6
7
8
9
10
11
12
13
14
15
16
17
18
19
20
21
22
23
24
25
26
|
第一步读取:ANSIBLE_CONFIG
第二步读取:当前项目目录下的ansible.cfg
第三步读取:当前用户家目录下的 .ansible.cfg
第四步读取: /etc/ansible/ansible.cfg
export ANSIBLE_CONFIG=/tmp/ansible.cfg
touch /tmp/ansible.cfg
ansible --version
unset ANSIBLE_CONFIG
mkdir project1
cd project1/
touch ansible.cfg
ansible --version
touch ~/.ansible.cfg
ansible --version
rm -f ~/.ansible.cfg
ansible --version
|
Inventory
简介
1
2
3
| 主要用来填写被管理主机及主机组信息(逻辑定义)
默认Inventory文件为/etc/ansible/hosts
也可以自定义一个我看,使用ansible命令 -i 参数指定Inventory文件位置
|
主机清单定义方式
用户密码
1
2
3
4
5
6
7
8
9
10
11
12
13
14
15
16
17
18
19
20
21
22
|
[server1]
192.168.0.11 ansible_ssh_port=22 ansible_ssh_user=root ansible_ssh_pass='123456'
192.168.0.12 ansible_ssh_port=22 ansible_ssh_user=root ansible_ssh_pass='123456'
[server1]
192.168.0.11
192.168.0.11
[server1:vars]
ansible_ssh_port=22
ansible_ssh_user=root
ansible_ssh_pass='123456'
[server1]
192.168.0.[11:100] ansible_ssh_port=22 ansible_ssh_user=root ansible_ssh_pass='123456'
[server1]
server[1:2].test.com ansible_ssh_port=22 ansible_ssh_user=root ansible_ssh_pass='123456'
|
免密
1
2
3
4
5
6
7
8
9
10
11
12
13
14
15
16
17
18
19
20
21
22
23
24
|
ssh-keygen -f ~/.ssh/id_rsa -P '' -q
yum install sshpass
sshpass -p123456 ssh-copy-id -f -i ~/.ssh/id_rsa.pub "-o StrictHostKeyChecking=no" root@10.0.0.100 >/dev/null 2>&1
[server1]
192.168.0.11
192.168.0.12
[db]
192.168.0.[100:110]
[server1]
server[1:100]
ansible server --list-hosts
|
匹配主机组的方式
ansible命令格式
1
| ansible <host-pattern> [-m module_name] [-a args]
|
host-pattern的使用:
1
2
3
4
5
6
7
8
9
10
11
12
13
14
15
16
17
18
|
ansible all -m ping
ansible "server*" -m ping
ansible 192.168.0.* -m ping
ansible "server1:&db1" -m ping
ansible "server1:db1" -m ping
ansible "server1:!db1" -m ping
ansible "~(web|db).*" -m ping
|
使用普通用户管理被控端
ansible使用test普通用户统一管理所有被控端节点
1
2
3
4
5
6
7
8
9
10
11
12
13
14
15
16
17
18
19
20
21
|
useradd test
echo '123' |passwd --stdin test
su - test
ssh-keygen -f ~/.ssh/id_rsa -P '' -q
sshpass -p123 ssh-copy-id -f -i ~/.ssh/id_rsa.pub "-o StrictHostKeyChecking=no" test@192.168.0.12 >/dev/null 2>&1
visudo
test ALL=(ALL) NOPASSWD: ALL
[privilege_escalation]
become=True
become_method=sudo
become_user=root
become_ask_pass=False
|
